Introduction:
Electric scooters have gained immense popularity as eco-friendly and efficient modes of transportation. However, like any battery-powered device, electric scooters eventually need to be charged. But what do you do when you find yourself without a charger? Fear not! Here, we will explore 10 creative solutions on how to charge electric scooter without charger. From improvising with household items to utilizing solar power, we’ve got you covered.
First you need to ensure your scooter voltage. You can use a multi-meter to know your scooter voltage. You need to use same voltage technique. For example if your scooter battery pack is 48 volt but you are using a 60 volt charger or 60 volt technique, this might damage your battery. So first know your scooter battery voltage. Then apply this following techniques to charge electric scooter without charger. You must connect positive to positive and negative to negative terminal or need to use suitable connection plug.
1. Using Household Items:
1.1. Laptop Charger:
If you have a laptop or a similar device with a USB-C port, you might be in luck. Some electric scooters can be charged using a USB-C cable. Connect your scooter to your laptop using a compatible cable and let it charge for a few hours. Keep in mind that the charging rate might be slower than using the original charger.
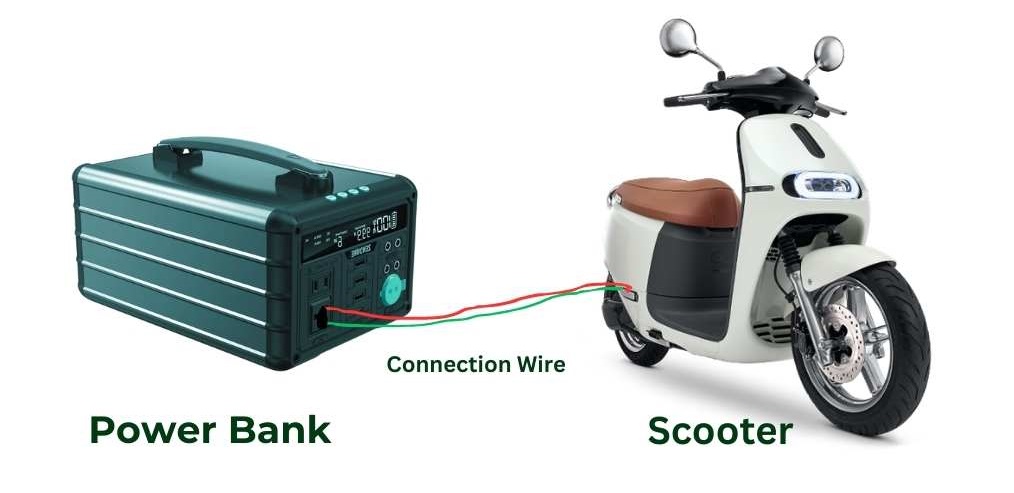
1.2. Power Banks:
Power banks have become a lifesaver in our digital age, and they can be handy for charging electric scooters too. Ensure you have a power bank with a sufficient capacity and a compatible output voltage. Connect your scooter port to the power bank DC port using the appropriate cable and let it charge.
2. Solar Power:
2.1. Solar Chargers:
If you’re an outdoors enthusiast, investing in a portable solar charger could be a game-changer. These chargers can generate electricity from the sun’s rays and store it in a built-in battery or a power bank. Attach the solar charger to your scooter’s battery and let it soak up the sun. Keep in mind that the charging time will depend on sunlight intensity and the capacity of the solar charger.
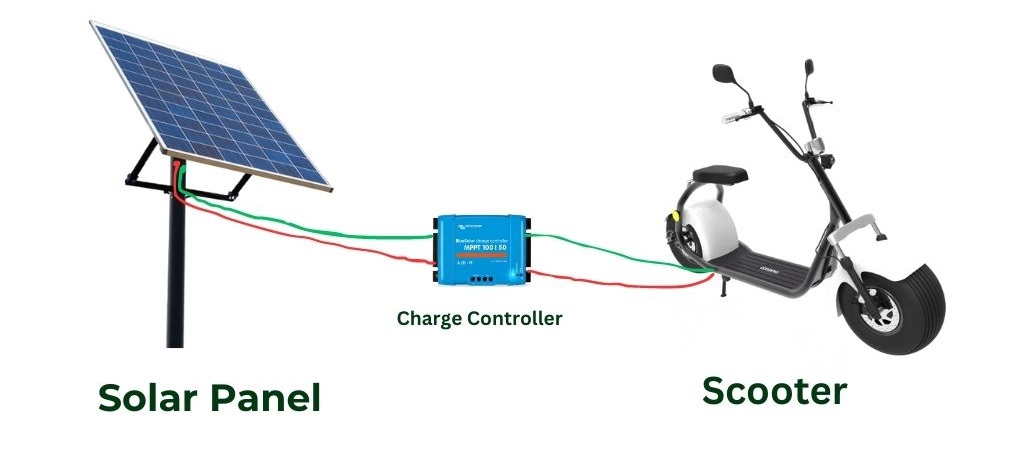
2.2. DIY Solar Charging:
Feeling crafty? You can create your own makeshift solar charging station using a solar panel, a voltage regulator, and some basic wiring skills. Position the solar panel in direct sunlight, connect it to the voltage regulator, adjust the voltage output to match your scooter’s requirements, and connect it to the battery.
If you have 12v individual solar panel without battery. If your scooter battery pack voltage is 48 then you can connect this 4 panel in series so that the total power will b 48v.
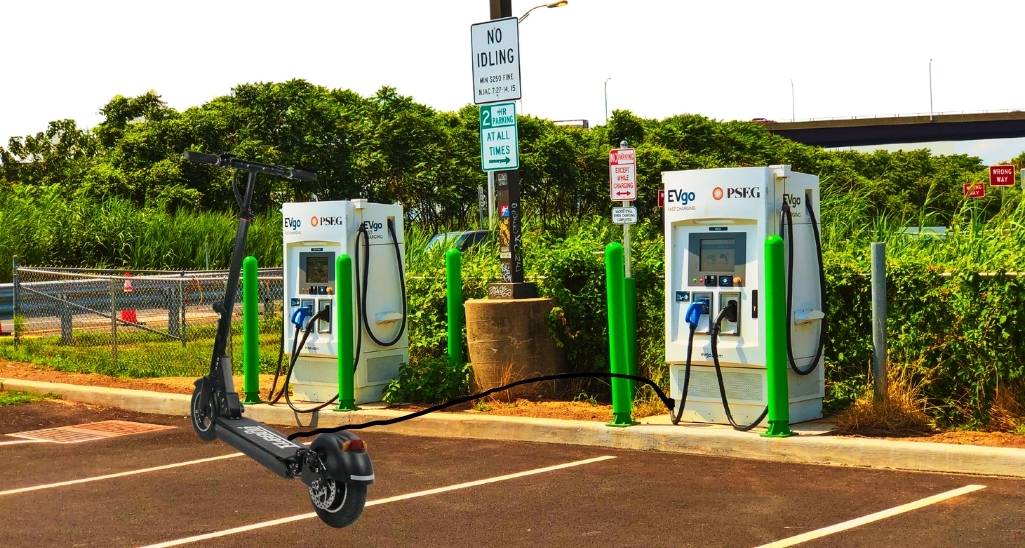
3. Utilizing Public Charging Stations:
3.1. Cafes and Restaurants:
Many urban areas offer public charging stations for various electronic devices, including scooters. Some cafes and restaurants have outlets or charging stations outside their premises. Grab a cup of coffee, plug in your scooter, and enjoy a well-deserved break while your ride charges.
3.2. Bike Sharing Stations:
In some cities, bike-sharing stations also offer charging options for electric scooters. These stations are equipped with charging docks, making it convenient for you to charge your scooter while you explore the city.
4. Emergency Charging Tips:
4.1. Borrow from a Friend:
If you’re in a pinch, consider borrowing a charger from a friend who owns a compatible electric scooter model. This can be a temporary solution to get your scooter charged until you can acquire a proper charger.
4.2. Contact Local Shops or Rental Services:
Some local shops or rental services that deal with electric scooters might have spare chargers available. Reach out to them and explain your situation. They might be willing to lend you a charger for a small fee or as a gesture of goodwill.
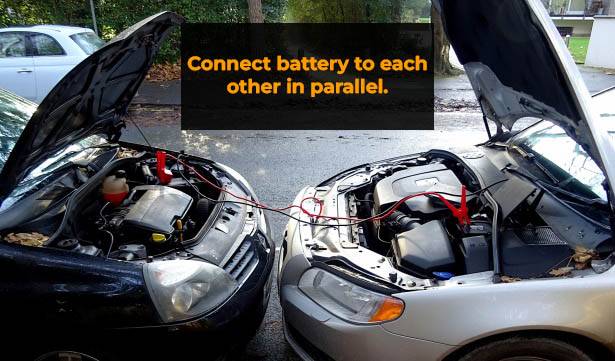
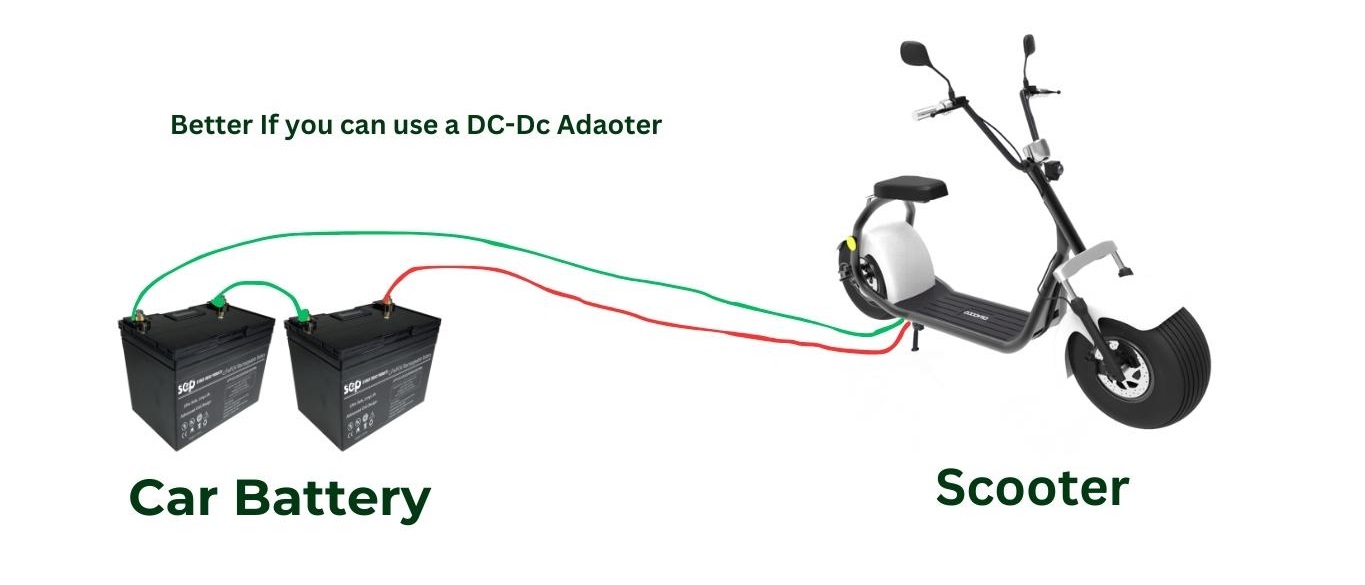
5. Using Car Battery:
Charging an electric scooter battery using a car battery can be done in emergencies, but it’s important to approach this method with caution. Car batteries have higher voltage and current output than scooter batteries, so improper connections can damage your scooter’s electrical system. Here’s a step-by-step guide on how to safely charge your electric scooter using a car battery:
Materials Needed:
- Car battery (with sufficient charge)
- Jumper cables (make sure they are in good condition)
- Crocodile clips (if jumper cables do not have built-in clips)
- Voltage regulator (if available, to control voltage output)
Connection Steps:
5.1. Safety Precautions:
Before proceeding, ensure both the car and scooter are turned off. Safety goggles and gloves are recommended for protection.
5.2. Check Voltages:
Confirm the voltage of your scooter battery. Most electric scooters use batteries with a voltage between 24V and 60V. Car batteries typically have a voltage of 12V. To charge 24V scooter battery you need to connect 2 car battery each 12v in series, to charge 36v scooter battery need to connect 3 car battery each 12v in series, to charge 48v scooter battery need to connect 4 car battery each 12v in series and so on.
5.3. Prepare Jumper Cables:
Ensure the jumper cables are not damaged and the clips are secure. You may use crocodile clips if your jumper cables do not have built-in clips.
5.4. Connect the Car Battery:
- Connect the red clip (positive) of the jumper cable to the positive terminal of the car battery.
- Connect the black clip (negative) of the jumper cable to the negative terminal of the car battery.
5.5. Connect the Scooter:
- Connect the red clip (positive) of the jumper cable to the positive terminal of the scooter battery.
- Connect the black clip (negative) of the jumper cable to the scooter’s frame or a designated grounding point. Make sure it’s a metal part of the scooter and away from the battery.
5.6. Start the Car:
Start the car engine. This will provide power to the scooter battery. Or if your car battery have enough charge then you don’t need to start car engine.
5.7. Monitor Charging:
Monitor the scooter battery while it charges. Since the car battery has higher voltage, the charging process might be faster than usual. Keep an eye on the scooter’s battery indicator or use a multi-meter to check the voltage.
5.8. Disconnect Carefully:
- Turn off the car engine after a short while (5-10 minutes) to prevent overcharging the scooter battery.
- Disconnect the jumper cables in the reverse order of connection: black clip from the scooter, black clip from the car, red clip from the scooter, and finally, red clip from the car.
5.9. Test Scooter:
After disconnecting, turn on the scooter and check if it’s working properly. If the battery charge has increased, you’ve successfully charged your scooter using a car battery.
Remember, using a car battery for charging should be a last resort. It’s not the most optimal or recommended method, as it poses risks to both your scooter and car battery. Whenever possible, use the appropriate charger for your electric scooter to ensure the safety and longevity of your battery.
7. Using Wind Turbine:
Charging a scooter battery using a wind turbine involves harnessing the power of wind to generate electricity.
7.1. Selecting Equipment:
Choose a small wind turbine with an appropriate power output for your scooter battery. Look for models designed for residential or portable use. Ensure it produces DC electricity compatible with your scooter’s battery.
7.2. Location:
Place the wind turbine in a location with consistent wind flow. Elevated areas like rooftops or open fields are ideal. Avoid obstructions that may disrupt wind flow.
7.3. Wiring:
Connect the wind turbine’s output wires to a charge controller. The charge controller regulates the incoming electricity to prevent overcharging. Attach the charge controller to the scooter’s battery terminals. Wind turbine output voltage must be same to charge scooter battery.
7.4. Safety Measures:
Use safety measures like fuses and surge protectors to prevent damage to the scooter’s battery and electrical components.
7.5. Monitoring:
Regularly monitor the turbine’s performance and battery voltage. Adjust the turbine’s position or angle for optimal wind exposure.
7.6. Efficiency:
Wind turbines produce varying amounts of energy based on wind speed. Consider a battery bank to store excess energy during strong winds for later use.
7.7. Maintenance:
Keep the turbine clean and well-maintained. Regularly inspect for any damage or wear and tear.
7.8. Backup Charging:
Wind speeds can be unpredictable. Have an alternative charging method, like a solar panel, to ensure a consistent power supply.
7.9. Compatibility:
Ensure the voltage output from the turbine matches the scooter battery’s requirements. Using an inverter may be necessary to convert DC to AC if needed.
7.10. Adaptability:
Wind turbine charging may not be as consistent as traditional chargers. It’s best suited for off-grid or remote scenarios where wind resources are abundant.
Remember, wind turbine charging requires careful setup, maintenance, and monitoring. It’s a sustainable option, but feasibility depends on local wind conditions and scooter battery specifications.
See how to create a DIY wind turbine.
8. Using Hydro Turbine:
To charge a scooter battery using a hydro generator, follow these steps:
8.1. Setup:
Install a small hydro generator near a flowing water source. Ensure proper wiring and connections to the generator’s output.
8.2. Regulation:
Integrate a voltage regulator to stabilize the generated voltage. This prevents overcharging and damage to the scooter’s battery.
8.3. Converter:
Use a rectifier to convert the generated AC voltage into DC, suitable for charging the battery.
8.4. Connection:
Connect the DC output of the rectifier to the scooter’s battery terminals. Make sure to match polarities correctly.
8.5. Monitoring:
Implement monitoring systems to keep track of the battery’s state of charge and voltage levels. This helps prevent overcharging or undercharging.
8.6. Control:
Add a charge controller to manage the charging process efficiently, controlling the flow of current to the battery.
8.7. Safety:
Install appropriate safety mechanisms like fuses and circuit breakers to prevent accidents due to overcurrent or short circuits.
8.8. Efficiency:
Optimize the generator’s placement and design for maximum water flow and energy conversion efficiency.
8.9. Maintenance:
Regularly inspect and maintain the hydro generator, wiring, and components to ensure consistent and safe charging.
8.10. Environmental Impact:
Consider the ecological impact of using hydro power and ensure that the installation adheres to environmental regulations.
Remember, the efficiency of the setup depends on factors like water flow rate, generator capacity, and battery size. Proper design and careful execution will lead to effective charging while harnessing renewable energy from flowing water.
See How to create DIY hydro power electricity-
9. Using a Generator:
9.1. Generator Setup:
Place the generator outdoors in a well-ventilated area to prevent carbon monoxide buildup. Ensure it’s on a stable surface and far from flammable materials.
9.2. Safety Precautions:
Wear appropriate safety gear and follow generator manufacturer instructions. Turn off the generator before connecting or disconnecting any cables.
9.3. Battery Connection:
Identify the scooter battery terminals – positive (+) and negative (-). Use appropriate gauge cables to connect the positive terminal of the battery to the positive output of the generator and the negative terminal to the negative output.
9.4. Voltage Matching:
Check the battery voltage and ensure the generator’s output voltage matches. Most scooters use 12V batteries, so set the generator output to this level.
9.5. Start Generator:
Start the generator according to its instructions and allow it to stabilize. Avoid overloading by not connecting other high-power devices.
9.6. Charging Time:
Monitor the battery voltage using a multi-meter. Charging times vary based on battery capacity and discharge level. Once the battery reaches its recommended voltage (usually around 12.6-12.8V), disconnect the charger and generator.
9.7. Disconnect Safely:
Turn off the generator before disconnecting the cables. Remove the negative cable first, then the positive.
10. Using Universal Charger:
10.1. Check Compatibility:
Ensure the Universal Charger is compatible with your scooter’s battery voltage and type (lead-acid, lithium-ion, etc.).
10.2. Power Off:
Turn off the scooter and disconnect the battery from the scooter if possible.
10.3. Connect Charger:
Connect the charger’s positive (+) and negative (-) leads to the corresponding terminals on the battery. Red is usually positive, and black is negative.
10.4. Voltage and Current Settings:
Set the charger’s voltage and current output to match the scooter battery specifications. Ensure not to exceed the battery’s recommended values.
10.5. Plug-in Charger:
Plug the Universal Charger into a power outlet. The charger should start the charging process. Some chargers might have indicator lights or displays to show the charging progress.
10.6. Monitor Charging:
Keep an eye on the charger while it’s charging. Ensure it’s functioning properly and not overheating. Charging times can vary based on battery capacity and charger output.
10.7. Charge Completion:
Once the battery is fully charged, the charger should automatically switch to a maintenance mode or stop supplying power. Disconnect the charger from the battery and power outlet.
10.8. Reconnect Battery:
If disconnected, reconnect the battery to the scooter.
10.9. Safety First:
Always follow manufacturer instructions, wear safety gear, and work in a well-ventilated area. Avoid overcharging, and never leave a charging battery unattended.
Precautions and Considerations:
1. Voltage and Compatibility:
When using alternative charging methods, ensure that the voltage and current output match your scooter’s requirements. Using an incompatible power source could damage your scooter’s battery or electronics.
2. Safety First:
Always prioritize safety when experimenting with unconventional charging methods. Make sure that your scooter and charging setup are stable and secure to prevent accidents. Make sure your scooter have a circuit breaker.
3. Monitor Charging:
Regularly check the progress of your scooter’s charging when using non-standard methods. Overcharging can lead to battery degradation or even safety hazards.
4. Manufacturer Guidelines:
While these alternative charging methods can be useful in emergencies, they should not replace the manufacturer’s recommended charging process. Whenever possible, stick to the manufacturer-approved charger to ensure optimal battery health and longevity.
FAQ:
To charge an electric scooter without a charger, you can use a suitable power source and voltage converter. Connect the positive and negative terminals of the scooter battery to the power source using appropriate connectors. Make sure the voltage matches the battery’s requirement. However, this method can be risky and might damage the battery or pose safety hazards. It’s recommended to use the manufacturer-approved charger for safe and efficient charging.
Charging cost depends on its battery capacity and your local electricity rates. On average, it might cost around $0.10 to $0.30 for a full charge. This cost is significantly lower compared to fueling a gas-powered vehicle and can be even cheaper if you charge during off-peak hours when electricity rates are lower.
To charge a Razor electric scooter without a charger, you can use a compatible replacement charger or a similar charger with the same voltage and current output. Ensure the polarity (+/-) matches, and be cautious not to overcharge. Another option is to remove the battery and charge it separately with a proper charger. Always prioritize safety and follow manufacturer guidelines.
Charge’s lifespan varies depending on factors such as battery capacity, usage, and maintenance. Generally, a single charge can last between 15 to 40 miles (24 to 64 kilometers) on average for modern electric scooters. However, these figures can differ significantly based on the scooter’s model, battery type, terrain, speed, rider weight, and weather conditions. Regular battery care and proper charging practices can help extend the overall lifespan of an electric scooter’s charge over time.
Leaving your electric scooter charging overnight is generally not recommended. Overcharging can degrade the battery’s lifespan and pose safety risks like overheating or even fire. Charge your scooter during waking hours and unplug it once fully charged to ensure battery health and safety.
Electric scooters charge by connecting their built-in batteries to a power source using a charger. The charger converts electrical energy from the power source into a form that can be stored in the scooter’s battery. The battery stores this energy.
The charging time for electric scooters varies based on battery capacity and charger output. Typically, it takes around 4 to 8 hours to fully charge an electric scooter’s battery. Some high-performance models might take longer, while fast chargers can reduce charging times. It’s important to refer to the manufacturer’s guidelines for accurate charging time information.
Several reasons could prevent your electric scooter from charging: a faulty charger or charging port, a damaged battery, incorrect voltage settings, or a defective charging circuit.
Conclusion:
While it’s always recommended to use the manufacturer-approved charger for your electric scooter, unexpected situations can arise. The solutions mentioned in this blog post provide alternative ways to charge your scooter when you find yourself without the original charger. These 10 creative solutions of “how to charge electric scooter without charger” showcase the adaptability and resourcefulness of electric scooter enthusiasts. Just remember to exercise caution, ensure compatibility, and prioritize safety while exploring these unconventional charging methods.